
Traefik 2 - TLS Configuration (Rank A+ on SSLLabs)

Disclaimer: Due to the descriptions I give below, this post will be longer than my usual posts.
Security is everyone's business. As a security architect, I'm quite sensitive to these subjects.
As I talked about it recently, I migrated the reverse proxy of this blog from Traefik 1 to Traefik 2 recently. So I decided to configure the TLS part afterwards, my goal being to have a secure site (and therefore safe for my users) by letting Traefik manage all this part.
I'm not going to make a post just telling you what to do, which would have no other interest than to make you copy my configuration, but rather explain to you what the security layers I put in place are, and then how I set them up. As the saying goes, "If you give a man a fish, he'll eat one day. If you teach him how to fish he will always eat". With this post, no more empty stomachs!
The different security layers used
TLS
TLS is a protocol for secure information exchange between a client and a server. It is the logical evolution of SSL. I had explained the basic principle of TLS in one of my previous posts, which I invite you to read if you want more information.
Then you have to understand that there are several versions of TLS from TLS 1.0 to TLS 1.3 and take into account the fact that not all browsers and OSes support all TLS versions. In general, TLS 1.2 and 1.3 (with a few nuances that I will talk about later) are the most recent versions. TLS 1.0 and 1.1 are obsolete and about the same as not putting any protection at all.
Then the TLS is composed of subparts, the ciphers and curves. It is the latter that will allow to configure this protocol finely.
A cipher is the encryption algorithm used by the server to negotiate with its client. Indeed, during a connection, the client indicates to the server the algorithms it supports and will therefore respond with the strongest algorithm available if possible. Like the TLS version, ciphers are not compatible with all browsers and/or OS, so it is a matter of carefully choosing the algorithms that we allow, being aware that some clients will not be able to connect to our site, or in any case, without taking advantage of encryption in transit.
Then come the elliptic curves which are associated with the cipher and will allow to define the way the cipher will make its calculations.
The ciphers are very numerous, and it can be difficult to know which ones to choose. In this case, I recommend you to follow the recommendations of the ANSSI on this subject, which provides a very complete document to help you in your choices.
You will tell me in this case, I can also authorize everything since the browser chooses the most reliable protocol ... and no! There is also a method called the TLS downgrade which consists in reducing the TLS version used, even on a recent browser, or in using an unsecured cipher. I'll talk below about the impacts this can have.
Headers returned by the server
Another layer of security available is through the headers that are sent back from the server to the browser. These headers will tell the browser what behaviour to follow and will indicate our security policy.
Be careful, however, keep in mind that the headers are indicative, and can be completely ignored by the browser.
The headers that I have defined are divided into two parts, firstly, the "user" headers, we will find 4 of them here:
- frameDeny : tells the browser that the page cannot be loaded in an iframe
- sslRedirect : Allows to indicate to redirect an http connection to https when possible
- browserXssFilter : Allows to limit "Cross Site Scripting" attacks from the browser (more info on XSS here)
- contentTypeNosniff : Tells the browser not to do mime type detection, the goal here is to limit "Drive by download" attacks (more info about drive by download here)
Then we have the HSTS (HTTP Strict Transport Security) headers, these headers will tell the browser to only communicate securely with the server. The major difference with a simple 301 header/Redirect to https is that the browser will not send any information to the server, such as user cookies. In case of a man in the middle attack, a site registered in HSTS with preloading will be protected. We have here 3 headers :
- stsSeconds : Tells the browser how long this domain should be accessed exclusively in https. To be able to use HSTS Preloading, this parameter must be at least 31536000 seconds (one year).
- stsPreload : Allows you to indicate that this site supports HSTS preloading, this allows you to secure the connection from the first attempt instead of the second. The preloading requires to register its site beforehand on https://hstspreload.org/ which will allow that it is directly present in the navigator.
- stsIncludeSubdomains : Allows to indicate that we want all the subdomains attached to the requested domain to be also in HSTS.
Important note on the HSTS: In order to be able to use the HSTS serenely with the preloading functions, it is necessary to make sure that the https is intended for long-term use on the site. It is simple to register in HSTS, it is difficult to ask for the deletion of its site. Moreover once a site is registered, the non support of https can prevent users from connecting.
Adding a DNS entry: the CAA field
We will now talk about the last action we are going to perform, which is to create a new DNS entry, of the CAA (Certification Authority Authorization) type.
This entry allows us to indicate which authorities we have authorized to issue a certificate for this domain. This field is not intended for browsers, but for certification authorities. This allows in case of misuse of a DNS record to issue the certificate only with certain authorities.
For my part, the CAA field is the following one, so it allows to indicate that my "recognized" certification authority is Let's Encrypt :
-sh-4.2$ dig CAA tferdinand.net

; <<>> DiG 9.9.4-RedHat-9.9.4-74.el7_6.1 <<>> CAA tferdinand.net
;; global options: +cmd
;; Got answer:
;; ->>HEADER<<- opcode: QUERY, status: NOERROR, id: 48603
;; flags: qr rd ra; QUERY: 1, ANSWER: 1, AUTHORITY: 0, ADDITIONAL: 1

;; OPT PSEUDOSECTION:
; EDNS: version: 0, flags:; udp: 4096
;; QUESTION SECTION:
;tferdinand.net.                        IN      CAA

;; ANSWER SECTION:
tferdinand.net.         86400   IN      CAA     0 issue "letsencrypt.org"

;; Query time: 10 msec
;; SERVER: 213.186.33.99#53(213.186.33.99)
;; WHEN: Tue Jan 14 06:27:49 CET 2020
;; MSG SIZE  rcvd: 77
I won't document in this post how to create this field, because the procedure is specific to your DNS server.
Why is it important to switch to full HTTPS, regardless of the site?
Since the beginning of this post, I've been telling you that https is important. So you'll tell me that I'm very nice, but that this site (for example) doesn't really seem very sensitive. But full https brings many advantages:
- It's safe for the user: Nobody wants to see when going to a site the little indication near the address bar "This site is not secure". This is not reassuring for a user. Moreover, many sites use back-office interfaces with authentication, so it is possible to exchange information in an encrypted way and protect against "man in the middle" attacks.
- This is secure for you: Https, and especially HSTS preloading, prevent your domain from being usurped as easily to publish malware for example.
- It's important for your SEO: More and more search engines are taking into account the configuration of https in SEO. Having a secure site allows you to be better referenced on the web.
- It's simple to have a certificate: Having an HTTPS certificate is now a matter of seconds, it is also possible to get one for free, there are no more excuses not to use one!
Configuring Traefik 2 to run full HTTPS
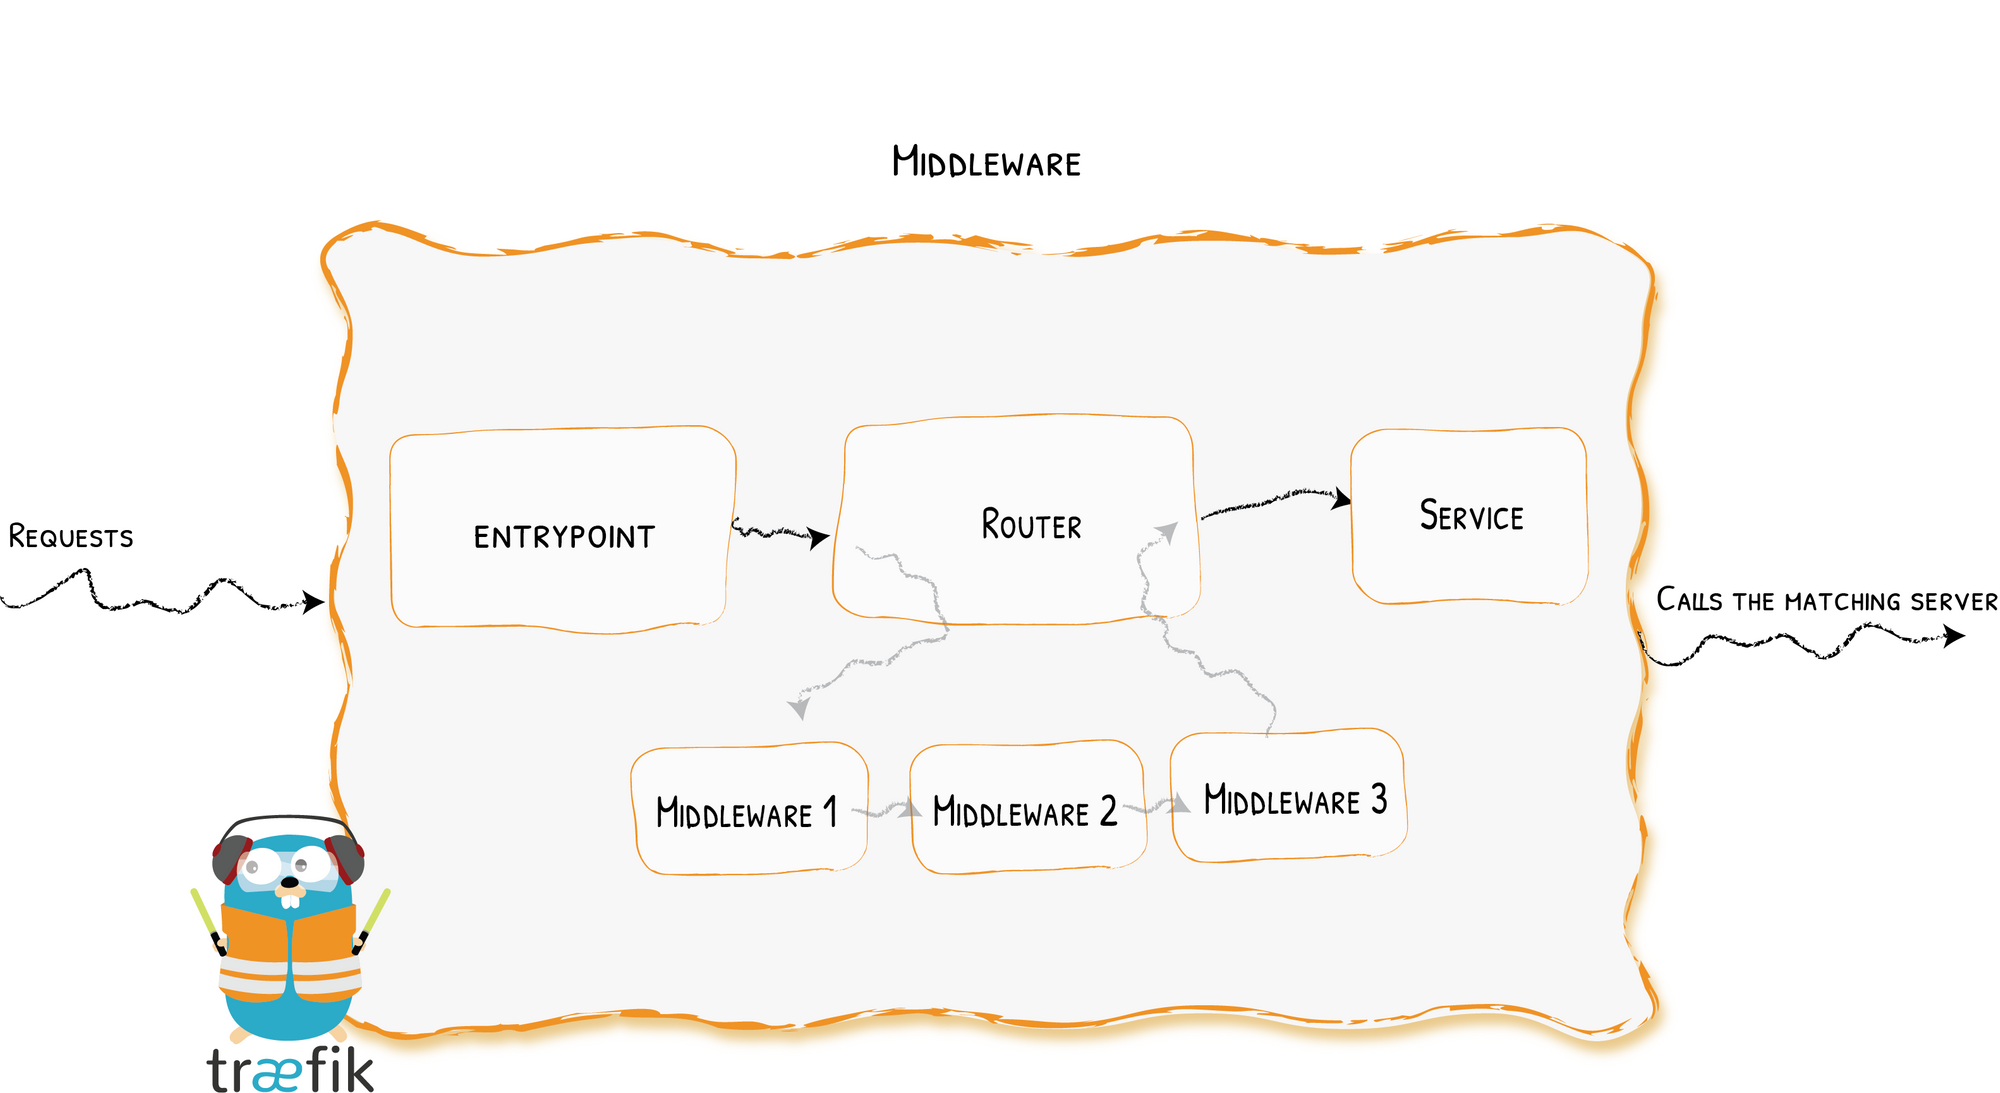
To configure the points I described above (except the CAA), we will use the middleware features of Traefik 2.
These middlewares are placed in interception between the frontend and the backend, and thus allow to modify the behavior before reaching the backend.
First, we will create a middleware. Thanks to Traefik's CRD, the middleware is a standard Kubernetes object. So we create the following configuration file :
apiVersion: traefik.containo.us/v1alpha1
kind: Middleware
metadata:
  name: security
spec:
  headers:
    frameDeny: true
    sslRedirect: true
    browserXssFilter: true
    contentTypeNosniff: true
    #HSTS
    stsIncludeSubdomains: true
    stsPreload: true
    stsSeconds: 31536000
We will therefore tell Traefik to send back the headers I mentioned earlier.
We then apply this modification with kubectl.
Then we will add a line in our IngressRoute http and https to tell Traefik to use this middleware.
apiVersion: traefik.containo.us/v1alpha1
kind: IngressRoute
metadata:
  name: traefik-web-ui
  namespace: default
spec:
  entryPoints:
    - web
  routes:
  - kind: Rule
    match: (Host(`www.tferdinand.net`) || Host(`tferdinand.net`)) && PathPrefix(`/`)
    services:
    - name: ghost-tfe-fr
      port: 2368
      helthcheck:
        path: /
        host: tferdinand.net
        intervalSeconds: 10
        timeoutSeconds: 5
    middlewares:
      - name: security

---
apiVersion: traefik.containo.us/v1alpha1
kind: IngressRoute
metadata:
  name: traefik-web-ui-tls
  namespace: default
spec:
  entryPoints:
    - websecure
  routes:
  - kind: Rule
    match: (Host(`www.tferdinand.net`) || Host(`tferdinand.net`)) && PathPrefix(`/`)
    services:
    - name: ghost-tfe-fr
      port: 2368
      helthcheck:
        path: /
        host: tferdinand.net
        intervalSeconds: 10
        timeoutSeconds: 5
    middlewares:
      - name: security
  tls:
    certResolver: le
    options:
      name: mytlsoption
      namespace: default
You can see on lines 20 and 43 the addition of the middleware. To fully use the HSTS, it is important that this middleware is present in HTTP and HTTPS.
Finally, we will create another Kubernetes object, again created by our CRDs, called TLSOptions. As its name indicates, this object will be used to tell Traefik how to behave on the TLS level.
apiVersion: traefik.containo.us/v1alpha1
kind: TLSOption
metadata:
  name: mytlsoption
  namespace: default
spec:
  minVersion: VersionTLS12
  cipherSuites:
    - TLS_ECDHE_RSA_WITH_AES_256_GCM_SHA384   # TLS 1.2
    - TLS_ECDHE_RSA_WITH_CHACHA20_POLY1305    # TLS 1.2
    - TLS_AES_256_GCM_SHA384                  # TLS 1.3
    - TLS_CHACHA20_POLY1305_SHA256            # TLS 1.3
  curvePreferences:
    - CurveP521
    - CurveP384
  sniStrict: true
This file contains the TLS options as I mentioned above. As you can see, I chose not to support below TLS 1.2 and only some ciphers and curves. Furthermore I have indicated to use my certificates exclusively in SNI mode (Server Name Indication, more information here). Please note that this configuration is quite strict and does not allow old and obsolete browsers and/or OS to connect.
Concerning the TLS 1.3, I have indicated some ciphers, nevertheless it must be taken into account that they are currently ignored by Traefik (as indicated in the official documentation which refers to the GoLang documentation).
We then apply our changes.
It is now possible to test your site on SSLLabs, and you should have a very positive evaluation without any worries. Note that this test is neither intrusive nor risky. The test consists in emulating browsers/OS to observe the behaviour of the site, and to control the possibility of certain hacks by the information returned by the server.


Comments ()