
Create a local Kubernetes cluster with Vagrant

Testing Kubernetes is quite easy thanks to solutions such as Minikube.
However, when you want to test cluster-specific features, such as load balancing or failover, it is not necessarily suitable anymore.
It is possible to build your Kubernetes infrastructure on servers, or by using managed services from a cloud provider (Kapsule at Scaleway, AKS at Azure, GKE at GCP or EKS at AWS for example).
Nevertheless, these solutions cost money. When you just want to test functionalities or self-training, it's not necessarily appropriate.
In this post, I propose you see how you can set up a Kubernetes cluster locally on your computer with a similar behavior as a classical cluster.
To do this, we will use several tools that I will describe below:
- Vagrant
- VirtualBox (or VMWare)
- K3S
- Traefik
Vagrant: Provisioning of virtual machines
Vagrant is a tool from HashiCorp (editor of Terraform I already mentioned).
This program allows to quickly deploy virtual machines by exploiting description files.
Thus by writing a VagrantFile, it is possible to deploy in a few minutes one or more machines, by provisioning them with scripts or tools such as Ansible.
The advantage of Vagrant is that it allows configuration sharing to allow a complete team to work under the same conditions locally, reproducing a low-cost production behavior.
A simple text file is enough to share. Moreover, it is in fact possible to version this file on a version management tool.
K3S: The lighter kubernetes
K3S is a tool created by Rancher (who also created an orchestrator of the same name for Docker).
It is a lightweight Kubernetes that can work on smaller configurations. It can work too without any problem on a raspberry pi.
In our case, it will allow us to override the limitations of K8S which requires at least 2G of ram to run.
Since we are going to create several servers, the idea is to limit the memory needed to the maximum.
In this post we will exploit the multimaster mode, which is very recent. If you want more information on this subject, I invite you to read the excellent article by my colleagues at WeScale [French Link].
Traefik : Again and again the load balancer
In order to reproduce as closely as possible the behavior of a classic cluster, we will also deploy a Traefik server as a front end, in front of Kubernetes, which will balance the load between the 3 master nodes.
The choice of Traefik is arbitrary, any reverse proxy will do.
Once again, the goal is to have something light, hence the use of Traefik which is very resource efficient.
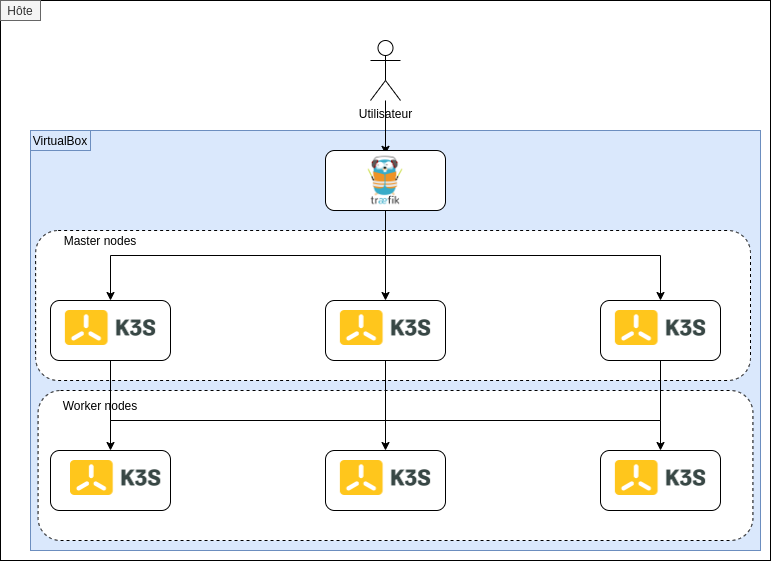
Target deployment overview
We are going to have 3 distinct layers in our deployment :
front_lb : A machine using Traefik to manage the incoming traffic to Kubernetes
kubemaster# : The 3 kubernetes "master" servers
kubenode#: The 3 kubernetes servers serving as execution nodes for the pods
Prerequisites and information
The deployment I will describe below has been tested and validated with the following configuration:
| Operating System | Parrot OS 4.10 |
| Total memory | 16 Go |
| CPU | Intel i7 10510u |
| Virtualization | VirtualBox 6.1.12 |
| Vagrant version | 2.2.9 |
The deployment does not normally use any of this information on a hard disk, but some settings may need to be adjusted depending on your host system.
Also, in order to allow my nodes to communicate with each other in SSH, I created a RSA key that I deploy automatically.
This key is in the ./.ssh directory, and it is necessary that you create it yourself before starting the deployment via Vagrant.
You can do it easily with the following command:
ssh-keygen -f ./.ssh/id_rsa
At the passphrase request, it is necessary not to put any, because we will use this key to have a scripted connection between our nodes.
It's time to get our hands dirty!
All right, enough talk, when do we deploy?
Not right away, first of all, let's look at what we're going to deploy.
The basic OS
In our machines, we will first have to deploy an operating system.
Vagrant uses a system of "boxes" which are actually images prepared for Vagrant. It is possible to get the list of boxes on the official website.
In our case, we will use a Ubuntu 18.04 box.
I'm not a fan of Ubuntu as a server, I prefer a good old Debian or Centos, but Ubuntu is the system officially supported by K3S.
For Traefik, I'll use the same box, just because I'm lazy. In itself, nothing prevents me from using another base box.
Masters
So we have at first the Kubernetes "masters" servers.
For the latter, we have two distinct cases.
The first server must use a parameter to indicate that we want to initiate a K3S cluster, with the "--cluster-init" parameter.
Then, the other nodes will have to connect to the first node with the secret generated by it.
To simplify the exchange of the secret, the second and third nodes will then download the file containing the secret via SCP (hence the creation of the SSH key).
In addition, we will tell K3S the IP address of the servers, because the VM has several network cards, so K3S would mount the wrong IP each time.
So here is the associated Vagrant configuration block :
MASTER_COUNT = 3
IMAGE = "ubuntu/bionic64"

...

Vagrant.configure("2") do |config|

  (1..MASTER_COUNT).each do |i|
    config.vm.define "kubemaster#{i}" do |kubemasters|
      kubemasters.vm.box = IMAGE
      kubemasters.vm.hostname = "kubemaster#{i}"
      kubemasters.vm.network  :private_network, ip: "10.0.0.#{i+10}"
      kubemasters.vm.provision "file", source: "./.ssh/id_rsa.pub", destination: "/tmp/id_rsa.pub"
      kubemasters.vm.provision "file", source: "./.ssh/id_rsa", destination: "/tmp/id_rsa"
      kubemasters.vm.provision "shell", privileged: true,  path: "scripts/master_install.sh"
    end
  end

...

end
- Line 8: Vagrant loop structure
- Line 11: We name each machine with a different host name.
- Line 12: Each machine will have a fixed IP allocated (from 10.0.0.11 to 10.0.0.13)
- Line 13/14: We push our SSH key which will be deployed by the script indicated in line 15
As you can see, the description of the Vagrant side is quite basic.
Now, let's see the second side of this deployment: the provisioning shell script.
#!/bin/sh

# Deploy keys to allow all nodes to connect each others as root
mv /tmp/id_rsa*  /root/.ssh/

chmod 400 /root/.ssh/id_rsa*
chown root:root  /root/.ssh/id_rsa*

cat /root/.ssh/id_rsa.pub >> /root/.ssh/authorized_keys
chmod 400 /root/.ssh/authorized_keys
chown root:root /root/.ssh/authorized_keys

# Add current node in  /etc/hosts
echo "127.0.1.1 $(hostname)" >> /etc/hosts

# Get current IP adress to launch k3S
current_ip=$(/sbin/ip -o -4 addr list enp0s8 | awk '{print $4}' | cut -d/ -f1)

# If we are on first node, launch k3s with cluster-init, else we join the existing cluster
if [ $(hostname) = "kubemaster1" ]
then
    curl -sfL https://get.k3s.io | INSTALL_K3S_EXEC="server --cluster-init --tls-san $(hostname) --bind-address=${current_ip} --advertise-address=${current_ip} --node-ip=${current_ip} --no-deploy=traefik" sh -
else
    echo "10.0.0.11  kubemaster1" >> /etc/hosts
    scp -o StrictHostKeyChecking=no root@kubemaster1:/var/lib/rancher/k3s/server/token /tmp/token
    curl -sfL https://get.k3s.io | INSTALL_K3S_EXEC="server --server https://kubemaster1:6443 --token-file /tmp/token --tls-san $(hostname) --bind-address=${current_ip} --advertise-address=${current_ip} --node-ip=${current_ip} --no-deploy=traefik" sh -
fi

# Wait for node to be ready and disable deployments on it
sleep 15
kubectl taint --overwrite node $(hostname) node-role.kubernetes.io/master=true:NoSchedule
Once again, let's cut out this script :
- Lines 4 to 11: We deploy our SSH key and add it as an authorized host.
- Line 19 to 27: If we are on the node "kubemaster1", we launch a cluster-init, otherwise we join the existing cluster.
- Lines 30 and 31: we wait 15 seconds for the node to be functional, then we "taint" it to indicate that the node should not execute pods. In fact, by default, since K3S is designed to work on small systems, the master runs in standalone mode and can also execute pods.
Note also that I disable the installation of Traefik, indeed, our nodes being masters, they are not supposed to run an Ingress Controller.
Execution nodes
In the same way, let's look at the contents of the VagrantFile as far as our execution nodes are concerned.
MASTER_COUNT = 3
IMAGE = "ubuntu/bionic64"

...

Vagrant.configure("2") do |config|

...

  (1..NODE_COUNT).each do |i|
    config.vm.define "kubenode#{i}" do |kubenodes|
      kubenodes.vm.box = IMAGE
      kubenodes.vm.hostname = "kubenode#{i}"
      kubenodes.vm.network  :private_network, ip: "10.0.0.#{i+20}"
      kubenodes.vm.provision "file", source: "./.ssh/id_rsa.pub", destination: "/tmp/id_rsa.pub"
      kubenodes.vm.provision "file", source: "./.ssh/id_rsa", destination: "/tmp/id_rsa"
      kubenodes.vm.provision "shell", privileged: true,  path: "scripts/node_install.sh"
    end
  end

...

end
As you can see, the content is pretty much the same as for the masters.
So the only differences are :
- The IP pool, we are this time between 10.0.0.21 and 10.0.0.23
- The script executed for provisioning
Let's take a look at provisioning:
#!/bin/sh

# Deploy keys to allow all nodes to connect each others as root
mv /tmp/id_rsa*  /root/.ssh/

chmod 400 /root/.ssh/id_rsa*
chown root:root  /root/.ssh/id_rsa*

cat /root/.ssh/id_rsa.pub >> /root/.ssh/authorized_keys
chmod 400 /root/.ssh/authorized_keys
chown root:root /root/.ssh/authorized_keys

# Add current node in  /etc/hosts
echo "127.0.1.1 $(hostname)" >> /etc/hosts

# Add kubemaster1 in  /etc/hosts
echo "10.0.0.11  kubemaster1" >> /etc/hosts

# Get current IP adress to launch k3S
current_ip=$(/sbin/ip -o -4 addr list enp0s8 | awk '{print $4}' | cut -d/ -f1)

# Launch k3s as agent
scp -o StrictHostKeyChecking=no root@kubemaster1:/var/lib/rancher/k3s/server/token /tmp/token
curl -sfL https://get.k3s.io | INSTALL_K3S_EXEC="agent --server https://kubemaster1:6443 --token-file /tmp/token --node-ip=${current_ip}" sh -
This time we have a much simpler script!
The first part always consists of deploying our SSH keys.
So the last line launches K3S in "agent" mode by telling it to connect to the kubemaster1 node (I chose this node arbitrarily, any of the 3 masters would have done).
Load balancer frontend: Traefik
Finally, we deploy our front load balancer.
This installation is very basic, since we have no production constraints, the need is not to be as secure as a productive environment, but simply to have a load balancer to reproduce the normal behavior of a Kubernetes cluster.
On the Vagrant side, we are still very basic:
MASTER_COUNT = 3
IMAGE = "ubuntu/bionic64"

...

Vagrant.configure("2") do |config|

...

  config.vm.define "front_lb" do |traefik|
      traefik.vm.box = IMAGE
      traefik.vm.hostname = "traefik"
      traefik.vm.network  :private_network, ip: "10.0.0.30"
      traefik.vm.provision "file", source: "./scripts/traefik/dynamic_conf.toml", destination: "/tmp/traefikconf/dynamic_conf.toml"
      traefik.vm.provision "file", source: "./scripts/traefik/static_conf.toml", destination: "/tmp/traefikconf/static_conf.toml"
      traefik.vm.provision "shell", privileged: true,  path: "scripts/lb_install.sh"
      traefik.vm.network "forwarded_port", guest: 6443, host: 6443
  end
end
This time, no SSH key, we rather push the Traefik configuration that I will describe below.
Then, we run the installation. In addition, we indicate to map port 6443 of the host (my machine) to 6443 of the virtual machine. This will allow me to run kubectl commands from my host through Traefik.
For Traefik, we have two configuration files :
- The static configuration: This is the basic configuration of Traefik, this is where we will indicate the listening port for example
- The dynamic configuration: This is where you will find the information that Traefik can collect on the fly, including the configuration of the endpoints.
Let's see our configuration.
Static configuration :
[entryPoints]
  [entryPoints.websecure]
    address = ":6443"
    [entryPoints.websecure.http.tls]
      [[entryPoints.websecure.http.tls.domains]]
        main = "10.0.0.30"

[providers.file]
  directory = "/tmp/traefikconf/"

[serversTransport]
  insecureSkipVerify = true
So we can see :
- That I listen in https on 6443 (default port of Kubernetes)
- I then indicate in which directory my dynamic configuration is located.
- I indicate not to check the certificate; indeed, my K3S server uses a self-signed certificate by default.
Then, the dynamic configuration, this is where I will define my endpoints. Note that any modification of this one is taken into account by Traefik instantly.
[http]

  [http.routers]
    [http.routers.routerTest]
      service = "k3s"
      rule = "Host(`10.0.0.30`)"

  [http.services]
    [http.services.k3s]
      [http.services.k3s.loadBalancer]
        [[http.services.k3s.loadBalancer.servers]]
          url = "https://10.0.0.11:6443"
        [[http.services.k3s.loadBalancer.servers]]
          url = "https://10.0.0.12:6443"
        [[http.services.k3s.loadBalancer.servers]]
          url = "https://10.0.0.13:6443"
Nothing original here either. First, I define a Traefik k3s service, to which I say to send any request that arrives with the host "10.0.0.30" (the IP address I set to Vagrant).
Then I define a load balancing on the 3 Kubernetes masters. Traefik's default behavior is the "round robin" mode, which means that it will send requests on each node one after the other, regardless of a possible load.
Finally, let's have a look at the installation shell script :
#!/bin/sh
# Download and deploy Traefik as a front load balancer
curl https://github.com/containous/traefik/releases/download/v2.2.11/traefik_v2.2.11_linux_amd64.tar.gz -o /tmp/traefik.tar.gz -L
cd /tmp/
tar xvfz ./traefik.tar.gz
nohup ./traefik --configFile=/tmp/traefikconf/static_conf.toml &> /dev/null&
This is the simplest of the three scripts. As you can see, I directly download the Traefik binary (version 2.2.11), because Traefik is also a standalone binary written in GO.
Then, I launch Traefik by detaching it from the terminal and simply telling it where its static configuration file is.
It's time to launch all this!
You can find all the code used in GitHub :
 teddy-ferdinand
Install Vagrant
First we need to install Vagrant.
Here we have several solutions available:
Installation via the package manager: Often the simplest solution under Linux, not all distributions have Vagrant and it should be noted that the version can sometimes be (very) late on the official site. For my part, this is the installation I did.
Standalone binary : Vagrant is a standalone binary written in GO, it is also available on the official website, you can also install it this way.
These two installations won't change anything afterwards, so choose the one that suits you best.
Launch deployment
Once Vagrant is installed, go to the root directory, where our VagrantFile is located. So we should have a structure similar to this one:
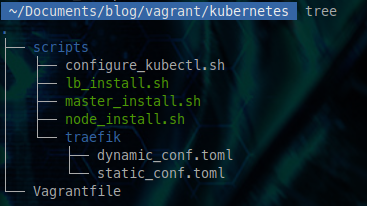
We can now launch the deployment with a simple
vagrant up
You should normally see the deployment begin, with the download of the Ubuntu box.
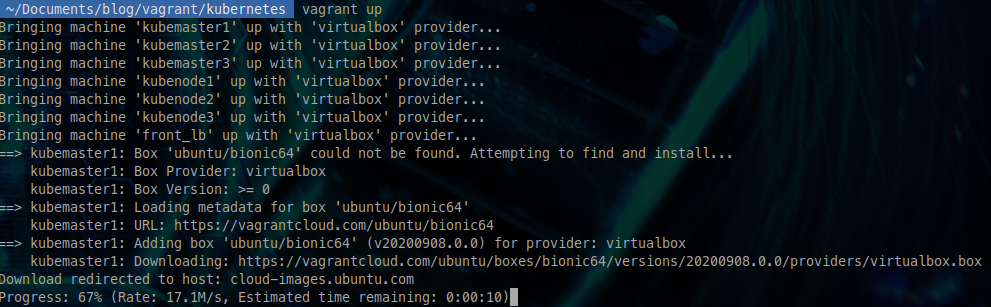
From there, full deployment will take about 10 minutes.
Connect to our cluster
Once the deployment is complete, Vagrant normally gives you back your hand.
All we have to do is configure the Kubernetes client on our workstation.
I left a little script that will allow you to download kubectl, and configure it to connect to our cluster, without touching any configuration already present on the host.
Here is its content :
#!/bin/sh

# Get kubectl
curl -L https://storage.googleapis.com/kubernetes-release/release/$(curl -s https://storage.googleapis.com/kubernetes-release/release/stable.txt)/bin/linux/amd64/kubectl -o /tmp/kubectlvagrant
chmod +x /tmp/kubectlvagrant

# Get password from master config file
PASSWORD=$(vagrant ssh kubemaster1 -c "sudo grep password /etc/rancher/k3s/k3s.yaml" | awk -F':' '{print $2}' | sed 's/ //g')

#Create kubectl config
cat << EOF > /tmp/kubectlvagrantconfig.yml
apiVersion: v1
clusters:
- cluster:
    server: https://10.0.0.30:6443
    insecure-skip-tls-verify: true
  name: default
contexts:
- context:
    cluster: default
    user: default
  name: default
current-context: default
kind: Config
preferences: {}
users:
- name: default
  user:
    password: ${PASSWORD}
    username: admin
EOF

# Create temp vars to use kubectl with vagrant
export KUBECONFIG=/tmp/kubectlvagrantconfig.yml
alias kubectl="/tmp/kubectlvagrant"
As you can see, this script will :
- Download the kubectl client and place it in /tmp/kubectlvagrant making it executable.
- Then, we will retrieve the admin login password of Kubernetes.
- We then insert this password in a kubeconfig configuration template. We will note the "insecure-skip-tls-verify" parameter which indicates to ignore the certificate, because once again we are on a certificate self-signed by Traefik. The back end is my virtual machine with Traefik.
- Finally, I create an environment variable to tell kubectl where to get its configuration and an alias for kubectl to point to the one we downloaded.
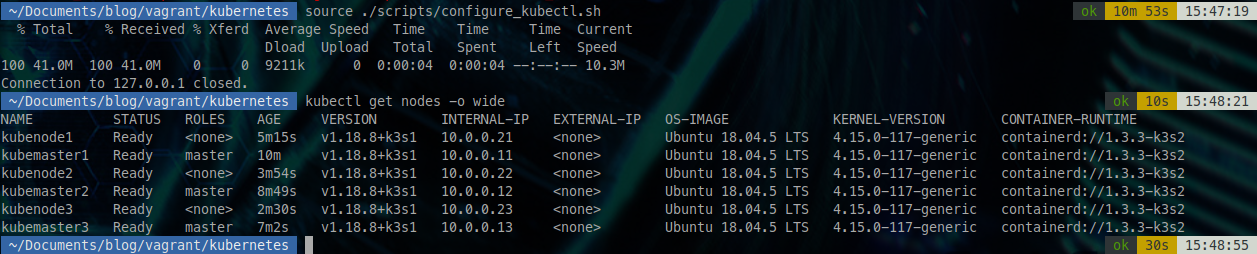
To use this script, you just have to source it
source ./scripts/configure_kubectl.sh
Be careful not to execute the script, aliases and export would not work, you have to source it well.
To go back to the initial state, just reopen a new terminal.
It's time to test our cluster!
Once our script is executed, let's try to see our nodes.
kubectl get nodes -o wide
It is possible that this request may take a little longer than normal since the cluster receives its first connection.
This is good news! We have our 3 masters and 3 execution nodes!
We're going to do a little basic test, namely to deploy a 3 Nginx pod.
kubectl apply -f https://raw.githubusercontent.com/kubernetes/website/master/content/fr/examples/controllers/nginx-deployment.yaml
Checking the deployed pods, we see 3 pods: 1 on each of our Kubernetes runtime nodes.
kubectl get pods -o wide

After about 30 seconds, they will go into "running".
As you can see, you can now use Kubernetes in a similar way to a production server.
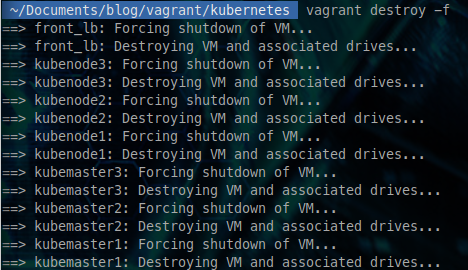
Once you don't need the cluster anymore, you can destroy it with a simple
vagrant destroy -f
After a minute, all your machines are now destroyed.
To conclude
As you can see, Vagrant makes it easy to create work environments, which makes application development or testing easier.
I also chose to use Traefik as a load balancer to show that there is also a Traefik binary. Indeed, we often talk about its Docker image, but it is above all a binary in GO.
Similarly, it is quite easy to create coherent infrastructures using Vagrant to reproduce a production environment.
The advantages are those I mentioned before:
- It's fast (10 minutes to create a complete cluster)
- It doesn't cost anything, since the host is your machine.
- It is easily transmitted, for example within a team.
If you want to know more about Vagrant, I recommend the Xavki YouTube playlist which explores the tool well [French Link]:


If you want to learn more about K3S, you can find content on the WeScale blog [French Link]:
 Romain BOULANGER
As always, feel free to comment! What do you think of Vagrant + K3S to have a local Kubernetes cluster?


Comments ()